When you ideate on your next Laravel project, don't forget that feeling, where you are lost in cloud thinking most of the work has been built into the framework.
2. we need to make sure that the Regions data is passed to the registration form's view. To do this, we need to override the
3. In the Registration form's view let use the
One such task not built into the framework is the country selector and any other data-driven task/feature.
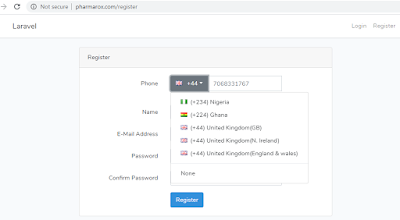
The image below is the desired end result.
 Components
Below are the different components and how to create them.
1. Countries Table and Model: running the command below on a command-line tool from within a Laravel project should help achieve this.
php artisan make:model Models\Country -m
our Table can be created with the SQL below;
CREATE TABLE `countries` (
	`id` BIGINT(20) UNSIGNED NOT NULL AUTO_INCREMENT,
	`name` VARCHAR(255) NOT NULL,
	`iso2` VARCHAR(255) NOT NULL,
	`created_at` TIMESTAMP NOT NULL DEFAULT CURRENT_TIMESTAMP,
	PRIMARY KEY (`id`)
)
COLLATE='utf8mb4_unicode_ci'
ENGINE=InnoDB;
2. Regions table and Model: A country might have many regions, each region is not expected to have more than one dialing code. but if it occurs we would simply create another region and append a roman numeral to the name of the new region.
php artisan make:model Models\Region -m
our Table can be created with the SQL below;
CREATE TABLE `dialing_codes` (
	`id` BIGINT(20) UNSIGNED NOT NULL AUTO_INCREMENT,
	`country_id` BIGINT(20) NOT NULL,
	`region` VARCHAR(255) NOT NULL,
	`prefix` VARCHAR(10) NOT NULL,
	PRIMARY KEY (`id`)
)
COLLATE='utf8mb4_unicode_ci'
ENGINE=InnoDB
3. Users table: by default, Laravel creates a stubbed migration for this, we simply need to modify it. such that the end result is the SQL below;
CREATE TABLE `users` (
	`id` BIGINT(20) UNSIGNED NOT NULL AUTO_INCREMENT,
	`fname` VARCHAR(255) NOT NULL,
	`email` VARCHAR(255) NULL DEFAULT NULL,
	`region_id` BIGINT(20) NOT NULL,
	`phone` VARCHAR(255) NOT NULL,
	`email_verified_at` TIMESTAMP NULL DEFAULT NULL,
	`phone_verified_at` TIMESTAMP NULL DEFAULT NULL,
	`password` VARCHAR(255) NOT NULL,
	`remember_token` VARCHAR(100) NULL DEFAULT NULL,
	`created_at` TIMESTAMP NULL DEFAULT NULL,
	`updated_at` TIMESTAMP NULL DEFAULT NULL,
	PRIMARY KEY (`id`),
	UNIQUE INDEX `users_phone_unique` (`phone`),
	UNIQUE INDEX `users_email_unique` (`email`)
)
COLLATE='utf8mb4_unicode_ci'
ENGINE=InnoDB;
PUTTING ALL PIECES TOGETHER
1. We need to establish a relationship between the Countries table and the Regions Tables. the relationship is one-to-many. One country can have many regions.
on the Country Model, we will define a function like below.
    public function regions()
    {
        return $this->hasMany('App\Models\Region');
    }
we also need to define the reverse of this relationship on the Region Model class file.
    public function country()
    {
        return $this->belongsTo('App\Models\Country');
    }
2. we need to make sure that the Regions data is passed to the registration form's view. To do this, we need to override the showRegistrationForm() function. go to "app\Http\Controllers\Auth\RegisterController.php" and paste the function below into the page.
    public function showRegistrationForm()
    {
        $phonePrefixList = Region::all();
        return view('auth.register',['phonePrefixList'=>$phonePrefixList]);
    }
Now anytime we open our
http://laraveltest.com/register we can use PHP to display the phonePrefixList which has been generated in the function above.3. In the Registration form's view let use the phonePrefixList variable which we have just defined and populated.
Goto
resources\views\auth\register.blade.phpPaste the code below into the form tag.
<div class="form-group row">
    <label for="phone" class="col-md-4 col-form-label text-md-right">{{ __('Phone') }}</label>
    <div class="col-md-6">
        <div class="input-group mb-3">
            <div class="input-group-prepend">
                <button id="prefixTrigger" class="btn btn-outline-secondary dropdown-toggle" type="button" data-toggle="dropdown" aria-haspopup="true" aria-expanded="false">
                    <i class="flag"></i>+
                </button>
                <div class="dropdown-menu">
                    @foreach ($phonePrefixList as $prefix)
                        <span class="dropdown-item" data-region="{{$prefix->id}}" data-prefix=" {{$prefix->prefix}}" data-iso2=" {{$prefix->iso2}}">
                            <i class="{{$prefix->iso2}} flag"></i>({{$prefix->prefix}}) {{$prefix->regionName}}
                        </span>
                    @endforeach
                    <div role="separator" class="dropdown-divider"></div>
                    <span class="dropdown-item" href="#">None</span>
                </div>
            </div>
            <input type="text" id="phone" class="form-control @error('phone') is-invalid @enderror" name="phone" value="{{ old('phone') }}" autocomplete="phone" aria-label="phone number without the intl' prefix" placeholder="7068331767">
            <input type="hidden" name="region" id="region">
        </div>
        @error('phone')
            <span class="invalid-feedback" role="alert">
                <strong>{{ $message }}</strong>
            </span>
        @enderror
    </div>
</div>
4. As you may notice, if you reload the page now, everything works fine except that the country flags are not displayed.
this is where we add some CSS and Sprites to our application.
get the sprites from the URLs below:
https://flag-sprites.com/get/flags.zip
https://flag-sprites.com
open the zip file and copy the image (flags.png) into your public assets folder e.g public\assets\images
create a style tag on your page and insert the following styles into the page.
<style>
i.flag:not(.icon):before {
        display:inline-block;
        position: relative;
        width:16px;
        height:11px;
        background:url(/assets/images/flags.png) no-repeat;
    }
i.flag:not(.icon) {
        display: inline-block;
        width: 16px;
        height: 11px;
        line-height: 11px;
        vertical-align: baseline;
        margin: 0em 0.5em 0em 0em;
        text-decoration: inherit;
        speak: none;
        font-smoothing: antialiased;
        -webkit-backface-visibility: hidden;
        backface-visibility: hidden;
    }
i.flag.gb:before, i.flag.GB:before,
    i.flag.uk:before, i.flag.UK:before,
    i.flag.united.kingdom:before {
      background-position:-112px -44px;
    }
i.flag.ng:before, i.flag.NG:before, i.flag.nigeria:before {
        background-position:-208px -99px;
    }
i.flag.gh:before, i.flag.GH:before, i.flag.ghana:before {
      background-position:-208px -44px;
    }
</style>
After doing this you can refresh the page and you should be able to get the desired looks and styling on your website. But there remain some user interaction issues.
For Example, what happens to the dropdown, before and after a user selects a country. How can we identify the user's selection after form submission?
At the bottom of your register.blade.php, use blade's @push to send the script below to your layout page.
6. Now let's insert a javascript library that will enable us to predict a default value for the dropdown.
At the bottom of register.blade.php, add the following code. notice the use of blade's push function.
We will update our layouts/app.blade.php to capture the push using a stack.
@push('js_partial_head')
<script language="JavaScript" src="http://www.geoplugin.net/javascript.gp" type="text/javascript"></script>
<script type="text/javascript">
    regions=<?=json_encode($phonePrefixList);?>;
</script>
@endpush
7. Now, go to resources/views/layouts/app.blade.php, here we will create a stack to catch what we pushed in the previous paragraph.
paste the following code anywhere in the <head>
@stack('js_partial_head')by so doing, we have loaded the region data set into the javascript memory and also inserted a library to capture the visitor's location.
also, go to the bottom of this page just before the closing of the body tag and paste the code below in.
@stack('js_partial').by doing this we have created a stack that we can push more scripts into.
8. Now in register.blade.php, go to the bottom of the page and paste the code below.
@push('js_partial')
<script type="text/javascript">
    // this will help us detect the closest default value for the drop down.
    defaultIso2= geoplugin_countryCode();
    for (var i = regions.length - 1; i >= 0; i--) {
        if ($('button#prefixTrigger').data('dirty')=='true') break;
        if (regions[i]['iso2'] == defaultIso2) {
            flagMarkup="<i class=\""+defaultIso2+" flag\"></i>"+regions[i].prefix+"";
            $('button#prefixTrigger').html(flagMarkup);
            $('#region').val(regions[i].id); // this populates a hidden field in `the form
        }
    }

    // this will ensure that the dropdown display is updated when user changes/selects an option from the dropdown.
    $('.dropdown-item').on('click', function(evt){
        // evt.preventDefault();
        prefix=$(this).data('prefix');
        iso2=$(this).data('iso2');
        $('button#prefixTrigger').data('dirty','true');
        flagMarkup="<i class=\""+iso2+" flag\"></i>"+prefix+"";
        $('button#prefixTrigger').html(flagMarkup);

        $('#region').val($(this).data('region'));// this populates a hidden field in the form
    });
</script>
@endpush
Comments
Post a Comment