
Resolving Incompatible Builds of PHP and Apache in Laragon: Add multiple versions of Apache

 As developers, it's often the case that different versions of PHP and server tools are installed quickly without taking into account the architecture for which they were built. In this article, we will focus on solving a specific error that arises when running incompatible builds of PHP and Apache.


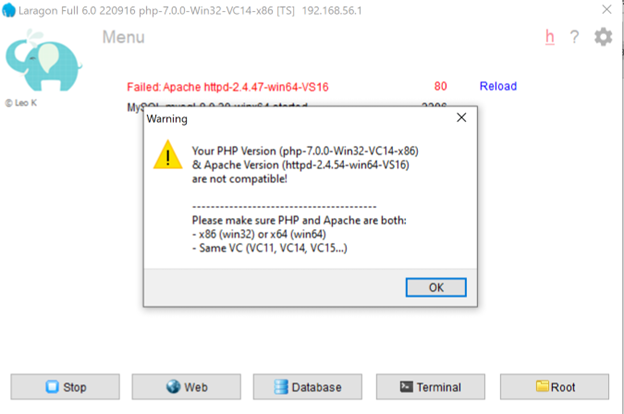
Recently, I encountered an issue when downgrading my Laragon setup from PHP 8.1 (x64) to PHP 7.x (x86). This caused compatibility problems with Apache, and I received an error message indicating that my PHP and Apache builds were not compatible, as the Apache installed was built for x64 versions of PHP.

In this article, I'll provide a step-by-step guide on how to install multiple versions of Apache on Laragon. By following these steps, you can resolve any similar issues that you may encounter.


Step 1: Download the Latest Version of Apache

Visit https://www.apachelounge.com/download/additional/ to download the latest version of Apache. The homepage provides quick access to 64-bit versions, but to access the 32-bit versions, use this URL.


Step 2: Choose Your Apache Version

From the list of recent and actively maintained Apache versions, choose the version you want to install. The most recent version is highlighted in yellow for easy reference.


Step 3: Select Your Build

On the next page, you'll find links for both the Win64 version and the Win32 version. The Win32 version is compatible with x86, while the Win64 is compatible with x64.


Step 4: Download and Locate the Zip File

The downloaded file will be in your downloads folder. Copy and paste it into the Laragon folder for Apache versions (C:\laragon\bin\apache). After unzipping, a new folder should be created.


Step 5: Delete Unnecessary Files

Open the unzipped folder and delete all unnecessary files. The actual content is inside a sub-folder named "Apache24".


Step 6: Copy Files to the Correct Location

Cut all files from the sub-folder and paste them into a new location, one folder back (C:\laragon\bin\apache\httpd-2.4.54-win32-VC15), then delete the Apache24 folder (highlighted in red).


Step 7: Update the Configuration File

Open the httpd.conf configuration file and find the line with "Define SRVROOT "c:/Apache24". Replace "c:/Apache24" with the correct path for the new Apache folder (C:/laragon/bin/apache/httpd-2.4.54-win32-VC15).

before

after


Step 8: Select the Correct Apache and PHP Versions

In Laragon, stop all services and select the new Apache version and a 32-bit PHP version suffixed with "x86".


Step 9: Start All Services

Start all services, and you should no longer encounter any errors.


In conclusion, when you encounter an error indicating that your PHP and Apache builds are not compatible, simply follow these steps to select the appropriate Apache version.

Although in this article, we downgraded Apache to match the PHP version, alternatively, we could also upgrade or downgrade PHP to match with Apache’s version.


Extra

This article you have just read was proofread/edited by Chat-GPT. First, I wrote this article on a notepad, and then I asked Chat-GPT to "re-write as a professional tech blogger". Click the link to see the original article. I also asked it to give an appropriate title for the post.

Comments

Popular Articles

Installing Docker on Ubuntu 18.04 ([SOLVED]- libseccomp2 version 2.3.1 installed but 2.4 required)

 Introduction: If you're attempting to install Docker on Ubuntu 18.04 Bionic Beaver, which is known for having installation issues, this comprehensive guide aims to address common errors you may encounter during the process. Our goal is to save you time searching for answers on StackOverflow by providing clear instructions. The guide is based on the official Docker documentation available at https://docs.docker.com/engine/install/ubuntu/#install-using-the-repository. Step 1: Updating Package Lists To begin, run the following command to update your package lists using the "apt-get update" command: sudo apt-get update Note: If you encounter any errors during the update process, it may be due to the older Ubuntu 18.04 release. In such cases, you can refer to the Configure DNS server IP to resolve errors with apt-get update  guide for assistance. This guide will help you address any DNS-related issues that might be preventing successful updates. Step 2: Installing Dependencie...

[SOLVED] Linux - Issues installing Docker on Ubuntu - libseccomp2 version 2.3.1 installed but 2.4 required

This article has been improved for a better understanding - goto  https://splashcoder.blogspot.com/2023/07/installing-docker-on-ubuntu-1804-solved.html There is a possibility that you are trying to install docker. There is a very comprehensive guide at https://docs.docker.com/engine/install/ubuntu/#install-using-the-repository. The linked guide serves as a reference for this article. We try to address the common errors in this article. Just so you won’t have to scour the entire answers on StackOverflow. Step 1: The first thing is to run our famous "apt update" command. So run the command below. sudo apt-get update You may observe that there are some errors. And YES! we are using a fairly old Ubuntu 18.04 Bionic Beaver Release. It seems perfect for this as most people have issues installing docker anyways. To resolve this, you may refer to  Configure DNS server IP to resolve errors with apt-get update Step 2: Following the Docker article, we should run the commands below. sudo...

Linux - Configure DNS server IP to resolve errors with apt-get update

Perhaps you have a new install of Ubuntu, and you are about to install docker or any other Linux packages. The first step is to update the application repositories using the sudo apt update command. There is a very small possibility that you will get the error below if you are using a fresh install of the Ubuntu 18.04 LTS (Bionic Beaver). This error simply means that Linux is unable to connect to the official repository likely due to a DNS configuration or a network issue. Here we try to help you resolve the DNS issue. To resolve this, you must specify a DNS in your network settings. Well, there is one popular DNS that works well: Google's DNS. Follow through, please. STEP 1: Go to the settings page of Linux (Ubuntu) STEP 2: This should reveal a plethora of options. On the left pane, simply scroll down and click Network as shown below. This reveals your different network connections, for me, “enp0s3” is the adapter connecter to the internet. So, I must configure DNS for “enp0s3”. ...